
Artboards

Oh, artboards. A concept so simple, yet it is one of my favorite features of Illustrator.
Think of artboards as individual canvases for your work. I love artboards because it's a way to naturally separate items that you're working on within a project. They are useful no matter what kind of project you're working on.
There are a few ways to add artboards to your project. Let's start with a new document.

All of the fields highlighted above are related to your artboards. In the Number of Artboards field, you can add up to 100 artboards to your project. The other options are related to how the artboards display in Illustrator. You can organize your artboards in several different ways, either by column, by row, only rows or only columns. One line down, you can even adjust the spacing between the artboards, and how many columns, if you specify that option.
Below that are options we've discussed in past blog posts, relating to document sizing and orientation. Whatever size you enter in the New Document dialog box, that's the size that all of your artboards will inherit. If you need many different sizes, there's a better option for you. I'll keep my settings the way I have them, with three artboards, and I'll click OK. Note that you're also not tied down by these options. You can always add more and change the size of artboards on the fly after you create your document. This is simply a starting point.

Another way to think of artboards is like paper on a table. You can move your 'paper' around, draw on them, and they function as separate documents inside of your Illustrator documents.
Let's talk about how to customize these artboards further, starting with resizing.

In your toolbar on the left hand side, you have an Artboard tool.
When you have that selected, you'll see one of your artboards highlighted on your screen with dotted lines, along with some context about that selected artboard up above.

In this image, Artboard 1 is selected, and you can see the size and placement of the artboards.
There are a lot of options for how to control your Artboards, let's discuss them one by one using the diagram below:

1 - Presets - This dropdown gives you a list of common sizes you might want to use. There are a ton of options here, from a letter to devices like an iPad, to 1080p HDTV.
2. Landscape/Portrait - Pretty straightforward, these options will rotate your artboard with a click.
3. New Artboard - This option uses the size that you specify in the presets panel. When you click this button and move your mouse onto the canvas, you will see a dotted outline of the artboard. Simply pick where you'd like for it to go, and click to drop it in place.
4. Delete - This option deletes the artboard you have selected. (Note that you can also delete an artboard by clicking in the right hand corner of any artboard while the artboard tool is selected.
5. Name - If you're dealing with a large document with a lot of artboards, or if you're interested in exporting a bunch of artboards at once, it's a good idea to name each one of your artboards, so they're easier to sort through.
6 - Move/Copy with Artboard - With this option selected, your artboard will also move any artwork that falls within its boundaries. Having this option is especially handy when you're dealing with complicated artwork where you may have a few artboards stacked on top of one another.
7 - Show Center Mark, Show Cross Hairs, Show Video Safe Areas - These three options have deal with placement of guide markers on your artboard.
8 - Artboard Options - When you select this button, it will bring up a dialog box that will give you many of the same options that you have in this top bar.
9 - Placement - These options all have to do with where your artboard is. The X and Y fields tie directly in with the reference point icon, directly to the left of the X field. Whichever of the nine reference point icons is selected is the base for the X and Y coordinates.
10 - The Width and Height fields allow you to specify the exact dimensions of your artboard. You can put in any measurements here, and Illustrator will understand it, whether it's inches, pixels, points, or millimeters. The icon in between Width and Height is the constrain proportions option. With this selected, any dimension you enter in the W or H field will adjust the alternate field as well.
Artboard Panel

Last, I want to talk about the Artboards Panel. If you do not see this in the list of panels on the right hand side, you can navigate to Window > Artboards.
This is a good way to see all your artboards listed in one place. As I mentioned earlier, it's a good idea to name each of your artboards, so they don't show up looking like my example. It's much easier to navigate a bunch of artboards if you have descriptive, well thought out artboard names. Think of this panel as the 'Artboard Organization' panel. The arrows at the bottom of the panel allow you to move the selected artboard up and down within the list. It won't move them around within your document, but it will sort them in this panel if you need them to show up in a specific order.

Almost every panel within Illustrator has an 'extra options' arrow in the top right corner. Clicking this icon will bring up new options for you. Most of these options are pretty straightforward, but I'll discuss Convert to Artboards and Rearrange Artboards.
Convert to Artboards - This option allows you to transform any rectangle into an artboard. Since an artboard has to be a rectangle or a square, You can't use circles or polygons to create new artboards.
Rearrange Artboards is one of the most powerful tools for reorganizing many artboards at once.
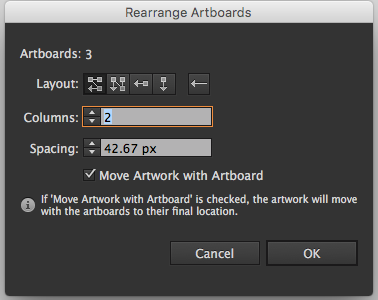
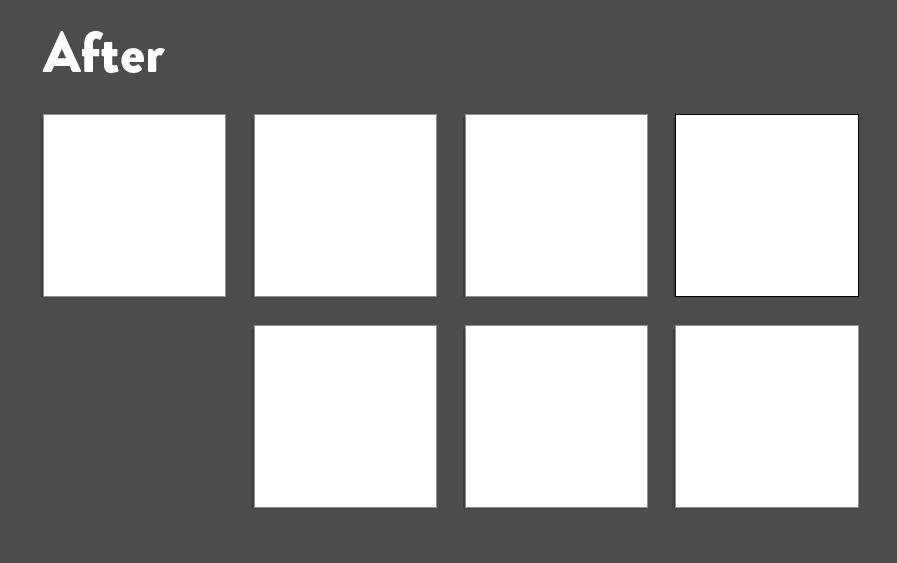
Again, this comes in handy if you're dealing with a large number of artboards at one time. You can choose the layout in the first section. This will determine the flow of your artboards when you reorganize them. Second is the columns. You can specify this, and it plays directly in with the option you chose in the layout field. Spacing is yet another place where you can decide how much space to put in between your artboards as they are rearranged. The last checkbox is crucial to keep selected if you already have artwork created. This will make sure that however you rearrange these, your artwork will go with it, without being left in random places on the canvas. The image below shows an example of how quickly the rearrange artboard can tidy up your canvas:

And that's all for Artboards! Did this blog post teach you anything you didn't previously know?
Most importantly, what else would you like to learn in Illustrator? Your comments and feedback are what drives the list of topics that this blog will hold, so please, let me know what you'd like to know!